• 0

Do-It-Yourself Epoxy Coatings Made Simple!

866.856.3325 | 248-858-8900
Top Rated Epoxy Coatings
  • 0
  • Home
  • Restore-A-Garage Epoxy – Epoxy Concrete Coatings#1 Rated Epoxy Coatings!
    • Restore-A-Garage Clear Top CoatRestore-A-Garage Epoxy 1.5 Gallon$249.95
    • Restore-A-Garage Epoxy 3 GallonRestore-A-Garage Epoxy 3 Gallon$359.95
    • Restore-A-Garage Epoxy 3 GallonRestore-A-Garage 2 Car Epoxy Kit$599.95
    • Restore-A-Garage Epoxy 3 GallonRestore-A-Garage 3 Car Epoxy Kit$699.95
    • Restore-A-Garage Clear Top Coat GallonRestore-A-Garage Clear Top Coat$299.99
    • Restore-A-Garage-Flecks-White-Gray-DarkGray-BlackRestore-A-Garage Decorative Fleck 1 Pound$14.99
    • Ranger-Patch-LogoRanger RE-18 Floor Patch$129.99
  • Restore-A-Garage Prep – Cleaners and EtchersEasy to Use Prep Products!
    • Ranger-Patch-LogoRanger RE-18 Floor Patch$129.99
    • Restore A Garage Etch CleanRestore-A-Garage Etch Clean$39.99
    • MasonrySaver_No__4cc83dcf02312 (1)MasonrySaver No Rinse Concrete Etch$79.00
    • Restore-A-Garage Cleaner DegreaserRestore-A-Garage Cleaner Degreaser$44.99
  • Restore-A-Garage Tools – Rollers, Mixers, etc.Prep & Application
    • R-A-G-Combo-Tool-Kit-1Restore-A-Garage Tool Kit$49.99 – $79.99
    • Restore-A-Garage-Coating-SqueegeeRestore-A-Garage Application Squeegee$24.99
    • Restore A Garage Spiked ShoesSpiked Shoes$34.99
    • Restore-A-Garage-Epoxy-Nap-RollerWooster Epoxy Glide 9″ 1/4″ Nap Roller Cover$9.99
    • Restore-A-Garage-Epoxy-Paint-MixerRestore-A-Garage Power Epoxy Mixer$14.99
    • Deck_Scrub_Brush_4a3e178533e42Scrub Brush$19.99
    • Restore A Garage Epoxy BrushWooster 3″ Epoxy Brush$9.99
    • Restore A Garage Epoxy Safety GlassesClear Safety Glasses$12.99
  • Need Help? – Q&AAsk Us!
    • R A G Garage Floor Measurement Chart 2Restore-A-Garage Epoxy Help Questions
    • Restore A Garage Etch CleanHow To Prep for Restore-A-Garage Epoxy Coating
    • Restore A Garage EpoxyHow To Apply Restore-A-Garage Epoxy Coating
    • Restore A Garage Clear Top CoatHow To Apply Restore-A-Garage Clear Top Coat
  • My account – Login/Logout
Contact Us: 866.856.3325
Top Rated Epoxy Coatings
  • 0
Top Rated Epoxy Coatings
  • Home
  • Restore-A-Garage Epoxy
  • Restore-A-Garage Prep
  • Restore-A-Garage Tools
  • Need Help or Questions?
  • How To Prep for Restore-A-Garage Epoxy Coating
  • How To Apply Restore-A-Garage Epoxy Coating
  • How To Apply Restore-A-Garage Clear Top Coat
  • The R-A-G Epoxy Contest
  • My Account/Login

Home Page Image

HEADER Desktop RAD

Home Page: RAG

Best Epoxy Coatings for Garages and Concrete Floors


The Best Epoxy Concrete Coatings


Tired of having a dirty garage or concrete floor?
The secret to a beautiful finish is to use the products professional contractors use. Restore-A-Garage has made these epoxy coatings, cleaners, and tools available to the public.

If your garage and concrete look terrible no matter what you try.
We can help with step-by-step directions and FREE how-to advice. There are techniques to make a finish look good and last.


Do-It-Yourself Epoxy Floor Coatings

Restore-A-Garage is an advanced, water-based, Concrete Epoxy Floor Coating used for maximum protection and longevity. Restore-A-Garage Epoxy Coating is a 100% solid, high build garage floor epoxy coating that undergoes a chemical reaction that results in a thick coating, tightly bonded to the prepared surface. Restore-A-Garage Epoxy Coating will protect against abrasions, stains, impact, and chipping AND IS resistant to moisture, dirt, chemicals, and salts making it ideal for those living in climates where rain and snow are common as the seasons change.

WHERE TO USE
Restore-A-Garage Epoxy Coating is ideal for all concrete types such as garage floors, warehouse floors, industrial floors, shop floors, basements, concrete patios, concrete countertops, wood, and metal.

Home Page Sliders

Restore-A-Garage Epoxy Coatings

Preloader Image
Restore-A-Garage Clear Top Coat

Restore-A-Garage Epoxy 1.5 Gallon

$249.95
5.00out of 5

Select options This product has multiple variants. The options may be chosen on the product page

Restore-A-Garage Epoxy 3 Gallon

Restore-A-Garage Epoxy 3 Gallon

$359.95
5.00out of 5

Select options This product has multiple variants. The options may be chosen on the product page

Restore-A-Garage Epoxy 3 Gallon

Restore-A-Garage 2 Car Epoxy Kit

$599.95
5.00out of 5

Select options This product has multiple variants. The options may be chosen on the product page

Restore-A-Garage Epoxy 3 Gallon

Restore-A-Garage 3 Car Epoxy Kit

$699.95
5out of 5

Select options This product has multiple variants. The options may be chosen on the product page

Restore-A-Garage Clear Top Coat Gallon

Restore-A-Garage Clear Top Coat

$299.99
5out of 5

Select options This product has multiple variants. The options may be chosen on the product page

Restore-A-Garage Decorative Fleck 1 Pound

$14.99
5out of 5

Select options This product has multiple variants. The options may be chosen on the product page

Ranger RE-18 Floor Patch

$129.99
5.00out of 5

Add to cart

Restore-A-Garage Tools and Prep

Preloader Image

Restore-A-Garage Tool Kit

$49.99 – $79.99
5out of 5

Select options This product has multiple variants. The options may be chosen on the product page

Restore-A-Garage Application Squeegee

$24.99
5.00out of 5

Add to cart

Spiked Shoes

$34.99
5.00out of 5

Add to cart

Wooster Epoxy Glide 9″ 1/4″ Nap Roller Cover

$9.99

Add to cart

Restore-A-Garage Power Epoxy Mixer

$14.99

Add to cart

Scrub Brush

$19.99

Add to cart

Wooster 3″ Epoxy Brush

$9.99

Add to cart

Clear Safety Glasses

$12.99

Add to cart

Epoxy Coating Reviews and Tips

Restore-A-Garage Epoxy Help Questions

by RAD Products May 15, 2023

We understand that you may need help with their Epoxy restoration and that not all projects are the same. 

We will ask some specific questions and reply to what you will need to do in your Epoxy restoration process and the appropriate products and amounts to purchase, so it receives the proper prep and treatment required.

In the comment section below, you must include:

  • Square Footage of Area to be Restored:
  • Approximate age of concrete:
  • If applicable, has a previous coating been used before:
  • Any oil or grease spills:
  • Do you have access to a pressure washer:
  • Miscellaneous info:
  • Include 1-3 Photos of Restoration Project. There is a link to upload photos in the bottom right corner of the comment area.

RESTORE-A-GARAGE EPOXY TIP SHEET

  1. Do not apply if the temperature is below 55° F or above 85° F.
  2. All prior coatings must be removed or grinded off to adhere properly.
  3. Apply only when temperature and humidity are at their lowest point of the day. Avoid hot direct sunlight.
  4. You must wait at least 30 to 60 days for new concrete to cure.
  5. The Epoxy material should be at 70° F to 75° F before using it.
  6. No water or rain for at least 48 hours after applying.
  7. No car traffic within the first 48 hours after applying.
  8. Be sure to fill all large cracks, holes, and depressions prior to applying.
  9. A complete cure of the Epoxy coating is 24 to 48 hours at 65º F and less than 50% humidity. Do not close the garage door, walk on, or drive on until fully cured. Temperatures lower than 75° will result in longer cure times.

COVERAGE:

One Coat except 2 coats recommended for Beige, White & Yellow colors.

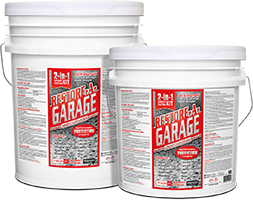
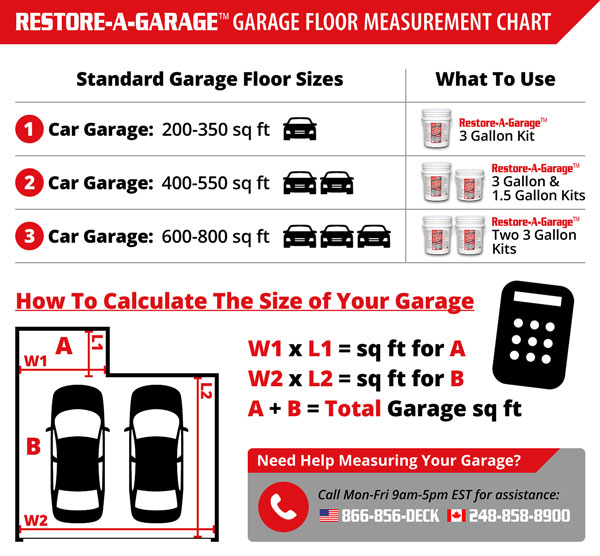
3-Gallon Epoxy Kit coverage 380-480 sq. Ft. at 10 mils dft or 240 sq. Ft. At 20 mils dft (dry film thickness)

1.5-Gallon Epoxy Kit coverage 190-240 sq. Ft. at 10 mils dft or 240 sq. Ft. At 20 mils dft (dry film thickness)

R A G Garage Floor Measurement Chart 2


330 comments
Epoxy Coating Reviews and Tips

How To Prep for Restore-A-Garage Epoxy Coating

by RAD Products May 15, 2023

Restore A Garage Etch CleanRESTORE-GARAGE EPOXY SURFACE PREPARATION

STEP 1 – Clean Surface

  1. Remove all items from the garage floor.
  2. Use a household broom to thoroughly sweep the entire garage floor. All dirt particles and debris should be swept off the floor.

NOTE: Removed items will not be able to return to the garage until 24 hours following the application.

Previously coated surfaces: Restore-A-Garage Prep Solution will not work on previously sealed, painted, or coated surfaces. If your garage has been previously sealed, painted, or coated, the use of a diamond grinder or shot blaster is recommended to remove those coatings and rough up the surface.

Oil or Grease Stained Floors: If your concrete oil/grease on the floor, Restore-A-Garage Cleaner/Degreaser in many cases will work to bring the oil/grease to the surface.  Degrease the area a few times and then follow the etching directions.

STEP -2 Etch Surface

Etch the Surface with Restore-A-Garage Etch Prep

NOTE: Proper surface preparation is very important because it ensures that the epoxy chemically bonds to the surface. If the surface is smooth, the epoxy does not perform effectively

  1. All dirt, oil, loose concrete, and foreign contaminants must be removed to assure a trouble-free bond to the substrate. No priming is necessary
  2. In a bucket, mix 1 part Restore-A-Garage Etch Prep Solution to 4 parts water. Mix the solution completely.
  3. Use a mop to spread the solution. Scrub from the far back corner of the garage to the garage entry. Be certain to use the solution liberally on crevices or cracks.
  4. Spray down the garage floor using only water from the hose. Work from the far back corner to the garage entry, having the water wash out of the garage through the garage entry. Be certain that all the Restore-A-Garage Prep Solution is completely washed away. Blanched foam may develop as the water from the hose washes the solution away and out of the garage.
  5. Let surface fully dry for 24 hours before proceeding with the application of Restore-A-Garage Epoxy Coatings.

Any Questions on How-To Prep? Ask Below.

26 comments
Epoxy Coating Reviews and Tips

How To Apply Restore-A-Garage Epoxy Coating

by RAD Products May 15, 2023

Restore A Garage EpoxyRESTORE-A-GARAGE EPOXY APPLICATION INSTRUCTIONS

Weather Conditions: Ensure the surface temperature is between 45ºF and 95ºF. Avoid application of product when the daily low is below 45 or when rain is expected within 12 hours. Do not apply in direct sunlight.

NOTE: It is best to work from the far back of the work area when applying the epoxy. Do not stand or walk on the epoxy during the application process or immediately following the application unless you are wearing the proper application spiked shoes. Protect Adjacent Areas: Use plastic, cardboard, and/or drop cloths to protect all adjacent non-target surfaces.

Equipment: Flat Squeegee, Drill, Drill Mixer Paddle, Roller.

  1. Make sure you have enough product for the area that is to be coated.
  2. Carefully remove the lid from the pail.
  3. Remove the can marked Part B from the cradle.
  4. Remove the cradle from the pail and discard it.
  5. Carefully remove the lock ring from the can and open the can.

Important Note: If the color you choose came in a tint pack (not pre-mixed into Part A) add this to the Part A first and mix for two minutes (Using a drill and a drill mixer paddle) prior to adding the Part B. If the color is already pre-mixed in, proceed to Step 6.

  1. Pour the entire contents of Part B into the pail, Part A.
  2. Using a drill motor and a mixer, blend material all together for 2 minutes, carefully moving the drill around to ensure a good mix. There must be no visible Part B remaining after the mix.
  3. Once the product has been mixed for 2 minutes, empty entire contents of pail onto the floor to be coated within 60 seconds after the mixing is completed. Pour the entire mixture into a uniform bead onto the floor in a straight line, making certain that the width of the epoxy poured out spreads approximately 12 to 14 inches on the floor. Move quickly when pouring the line to the floor.
  4. Use the squeegee to spread a 3 to 5-foot wide area. Continue to spread with squeegee and backroll with the roller to apply an even, thin application. Do not over-roll. You will have 30 minutes to apply the product to the surface. The product will cure in the pail after 35–40 minutes.
  5. After the Epoxy has been spread into an even coating, apply the fleck by casting (with an underhand toss) it evenly and thoroughly over the coated areas. Remember to break up your areas by only coating areas small enough that you can reach by casting the fleck as you will not be able to walk onto the epoxy after it has been coated.

The optional non-slip aluminum oxide additive should be applied after applying the decorative fleck. An easy way to apply it is by placing it in a hand-held seed spreader. This will allow you to broadcast the non-slip aluminum oxide additive evenly throughout the entire area.

NOTE: If the product is left in the bucket it will react and cure within 10 minutes and will not be usable. By pouring the epoxy onto the cool concrete, it will slow down the hardening process and give you a total work time of 35 minutes.

CAUTION: The material will become extremely hot if left in the bucket for longer than 10 minutes. Do not touch the bucket or material.

COVERAGE:

3-Gallon Epoxy Kit coverage 380-480 sq. Ft. (2 1/2 car garage) at 10 mils dft (dry film thickness)

1.5-Gallon Epoxy Kit coverage 190-240 sq. Ft. (2 1/2 car garage) at 10 mils dft (dry film thickness)

DRY/CURE TIME:

A complete cure of the Epoxy coating is 24 to 48 hours at 65º F and less than 50% humidity. Do not close the garage door, walk on, or drive on until fully cured. Temperatures lower than 75° will result in longer cure times.

CLEANUP:

Clean tools immediately after each use with soap and water.

Any Questions on How-To Prep? Ask Below.

38 comments
Epoxy Coating Reviews and Tips

How To Apply Restore-A-Garage Clear Top Coat

by RAD Products May 15, 2023

Restore A Garage Clear Top CoatRESTORE-A-GARAGE CLEAR TOP APPLICATION INSTRUCTIONS

Weather Conditions 

Ensure the surface temperature is between 45ºF and 95ºF. Avoid application of product when the daily low is below 45 or when rain is expected within 12 hours. Do not apply in direct sunlight.

The substrate must be clean, dry and sound with new concrete cured for at least 28 days. The surface must be free of dirt, dust, grease, oil and other foreign materials. A suitable moisture barrier must be in place for concrete slabs on-grade. If a moisture barrier is not in place, seasonal variations in ground moisture can cause excessive hydrostatic pressure regardless of results measured prior to the coating application.

MIXING

Separately stir Hardener and Resin components thoroughly.  Add the premixed Hardener to the Resin and mix with a low-speed mechanical mixer for 3-5 minutes. Mix until the product is thoroughly mixed and looks consistent. There is no induction time required and material can be used immediately.

APPLICATION INSTRUCTIONS

Restore-A-Garage Clear Top Coat can be applied from a roller tray or by pouring in a narrow bead directly onto the concrete surface and then applying with a 5/16” microfiber roller. Only mix enough material that can be used within the recommended pot life (see below). Always maintain a wet edge when rolling to avoid roller marks. When coating in higher temperatures or in direct sunlight, be careful to prevent any roller line marks. Do not over roll or roll back into the coating that has begun to tack up, this could trap air into film or cause roller marks.

Important Note: When applying the R-A-G Clear Top Coat over the Restore-A-Garage Epoxy Coating, we suggest lightly sanding the Epoxy coating with 100-120 grit sanding blocks/pads after it is fully dry. This will de-gloss the epoxy, create a good Epoxy surface profile and provide excellent adhesion for the R-A-G Clear Top Coat. You can avoid sanding by applying it 15-18 hours after applying the epoxy, but you risk the small chance of the R-A-G Clear Top Coat separating from the R-A-G Epoxy.

COVERAGE:

1-Gallon Clear Top Coat Kit covers 210-400 sq. Ft. at 4-7 mils

DRY/CURE TIME:

A complete cure of the Clear Top Coat is 24 to 48 hours at 65º F and less than 50% humidity. Do not close the garage door, walk on, or drive on until fully cured. Temperatures lower than 75° will result in longer cure times.

CLEANUP:

Clean tools immediately after each use with soap and water.

Any Questions on How-To Apply or Prep? Ask Below. 


10 comments
Load More Posts

Ships Free USA!

RAD Ships Free

WeShipTo USA CANADA

How-To Tips

  • Restore-A-Garage Help
  • How-To Apply R-A-G Epoxy
  • How-To Prep R-A-G
  • How To Apply R-A-G Clear Top Coat
  • Cart
  • Checkout
  • Contact
  • Coupon Code!
  • My account
  • Shop
  • UWCC Checkout
  • wpwBot Mobile App

© Copyright, All Rights Reserved - Site Operated By OPW/The Sealer Store


Back To Top
Phone
  • 0
X
Welcome to
Welcome to Restore-A-Garage!
Top R-A-G QuestionsFeatured ProductsContact Us
× qcwpbotmodal-content
  • Home
  • Restore-A-Garage Epoxy
    • [Dynamic Posts]
  • Restore-A-Garage Prep
    • [Dynamic Posts]
  • Restore-A-Garage Tools
    • [Dynamic Posts]
  • Need Help?
    • [Dynamic Posts]
  • My account

Shopping Cart

Close

No products in the cart.

Close